
November 30, 2011
Fit Your Body to Look Your Best
I was watching Studio 5 the other day and came across a segment that I thought was so important for every woman to know. It was all about the right fit for clothes and accessories. So many have the wrong idea when it comes to what it means to be the right size. Every brand and designer is different and has different patterns from which they make multiple items of clothing. It is up to us to try on as many sizes as we can from many brands or designers to make sure we get the perfect fit. And even after all of that, tailoring is still needed for some to get it just right. But don't get discouraged, clothes are made for the masses, it is up to us to make them unique to us. Take a minute to review these tips, it's easier than you think to look your best!
Pin It
October 14, 2011
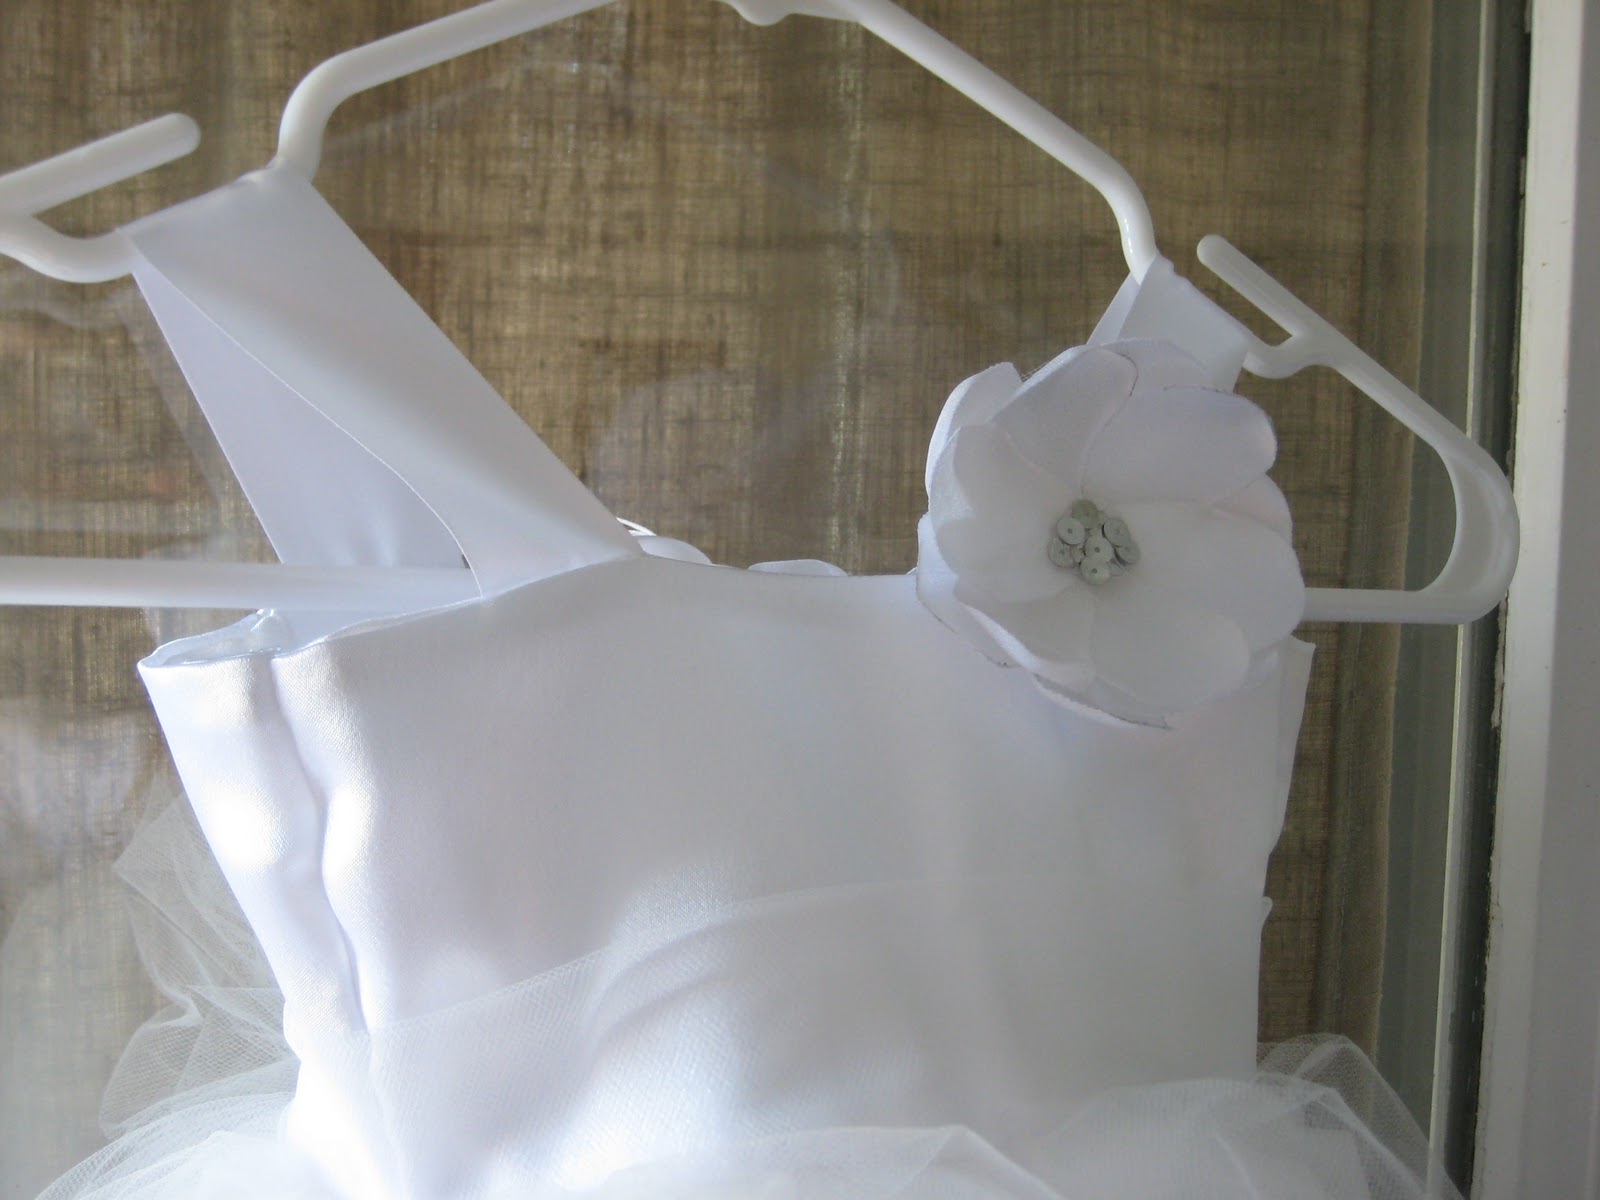
Flower Girls
A few months ago I was approached by a close friend who asked if I could make flower girl dresses for her her two little girls. This was a very fancy destination wedding and the girls needed to be up to par with the rest of the bridal party. Aren't they the cutest girls ever!


July 12, 2011
4th Of July Tutus


When I was young my mom and my aunt always dressed me, my siblings, and my cousins in matching outfits for our 4th of July family reunion. Some were cuter than others, but we still remember them and what a great time we all had together. This year, My cousin and I decided to carry on the tradition and dress our little girls in matching outfits. It was a lot of fun and really easy to create. The total outfit cost about $3.70 for the onesie and materials. Not to shabby!
It's a little hard to see, but the onesie just has a star cut out of felt that was hand stitched with white thread. We put little triangles of tulle behind it to give it texture and a navy button to tie together the read, white, and blue theme. The headband is just a piece of white elastic with two pieces of tulle tied into bows with a pearl button hotglued in the middle. The tutu is 1.5 yards of tulle cut into strips and tied around a piece of elastic. Super easy and full of impact!
It's a little hard to see, but the onesie just has a star cut out of felt that was hand stitched with white thread. We put little triangles of tulle behind it to give it texture and a navy button to tie together the read, white, and blue theme. The headband is just a piece of white elastic with two pieces of tulle tied into bows with a pearl button hotglued in the middle. The tutu is 1.5 yards of tulle cut into strips and tied around a piece of elastic. Super easy and full of impact!

May 24, 2011
Monthly Picture ribbon
Here is my little girls first month picture! The idea is to see how she changes and grows compared to the crib and the ribbon. This is an idea we got from my cousin Ashley. She uses a pennant with the number of months on it, and sits in their very cool green highchair. I decided to do a birthday ribbon. I used squares of tissue paper and glued it using a pencil like I used to do in elementary school. I thought it gave it a lot of texture and fun color. I can't wait to keep recording these monthly milestones and seeing how she grows and changes.
 Photobucket" border="0">
March 25, 2011
Wet/dry bags
As I have mentioned in past posts, I am going to be using cloth diapers. One thing you need is a wet bag to keep them in before you get to washing them. There are a lot of really cute ones online, but I figured I could make one just as cute for a lot less. I was able to use everything from my own stash so I didn't need to buy anything new. My pregnancy brain is really bad right now so I was unable to make up my own instructions and it was much easier to follow someone else. I followed a tutorial from A Lemon Squeezy Home that was very easy to follow and turns out great. I did make mine bigger then the tutorial suggests so it would hold more. I was also able to make it to match the color scheme of the nursery. I am very excited to start using them, mostly because that would mean my little one would be here already!


March 14, 2011
Spring time, Spring time, All around
I love spring! I always feel more rejuvenated and happy as winter slowly melts away. I love the tulips and daffodils that shoot out of the ground. I love the fact that it can snow in the morning and be melted and sunny by late afternoon. And believe it or not I also love spring cleaning. But, being a girl I especially love all the new spring dresses! I have always loved getting a new Easter dress as a little girl, and when I got older, getting a new dress for Sweethearts, Prom, & Spring fling. My mom always made my dresses, and we had fun designing the patterns and finding the perfect fabric. It totally stressed my mom out, but I contribute most of my love of design and sewing to those experiences. When I was in fashion design school I made my own wedding dress and I felt so proud of what I had accomplished. I always felt proud to wear those dresses and I still have a hard time parting with them because they made me feel so good when I wore them.

Over the years I have helped out other young girls feels the same way as they attend dances, weddings, graduation ceremonies and other important events. They have learned that you don't have to design and make a dress from scratch to get the look you want and to feel great, you just need a good seamstress and friend. Altering or redesigning something is the best and most cost effective way to create your own look.  This dress was way too short. I unpicked the hem and it still wasn't long enough. The top of the dress has fabric flowers out of different types of purple fabric. We were able to find a corresponding fabric to add as a trim and make it just a few inches longer.

This girl wanted a fun new dress to wear to a wedding, so I custom made this dress from a commercial pattern. Now she has a dress that fits her perfectly and she looks great!
 This dress was for a graduation party. It started out with just tiny straps. were able to find matching fabric to make thicker straps and a cap sleeve. It made a huge difference in the overall look of the dress.
So what if you find a dress but maybe you hate the straps. What if its too short or too long? Maybe you just wanted a certain color to brighten up your wardrobe. For all of these reasons and many more, I am here for you. Let your imagination go wild, or let me help you get started.
 This dress was way too short. I unpicked the hem and it still wasn't long enough. The top of the dress has fabric flowers out of different types of purple fabric. We were able to find a corresponding fabric to add as a trim and make it just a few inches longer.
This girl wanted a fun new dress to wear to a wedding, so I custom made this dress from a commercial pattern. Now she has a dress that fits her perfectly and she looks great!
 This dress was for a graduation party. It started out with just tiny straps. were able to find matching fabric to make thicker straps and a cap sleeve. It made a huge difference in the overall look of the dress.
So what if you find a dress but maybe you hate the straps. What if its too short or too long? Maybe you just wanted a certain color to brighten up your wardrobe. For all of these reasons and many more, I am here for you. Let your imagination go wild, or let me help you get started.
March 10, 2011
Embelished onesies

TWO BABIES! My sister in law just gave birth to twins today! I can't believe they are finally here to join our family. I am so glad that my little one will have playmates her same age.
I saw this iron on a few months ago that said 1 0f 2 and 2 of 2. I thought it was a perfect start to create fun and personal onesies for the twins. they were so easy, I might just have to make more for myself!
I saw this iron on a few months ago that said 1 0f 2 and 2 of 2. I thought it was a perfect start to create fun and personal onesies for the twins. they were so easy, I might just have to make more for myself!
March 8, 2011
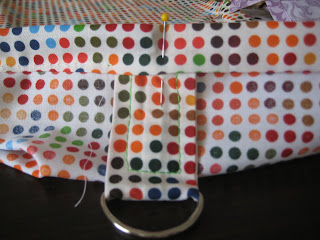
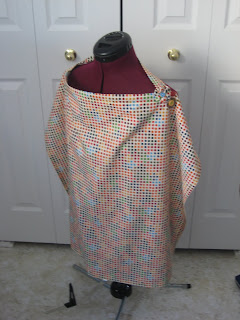
Nursing cover tutorial

Here is how to make these simple, but practical nursing covers.
Supplies you will need: 1yd of fabric, 2 D rings 1.5 in., 16 in. of boning, matching or contrasting thread, and any buttons or extra trims you want to add.
To get started: Cut your main piece @ 27in. by 35in., (the short side goes along the selvage) The long strap @ 25in. by 4in., and the short strap @ 6in. by 2in.
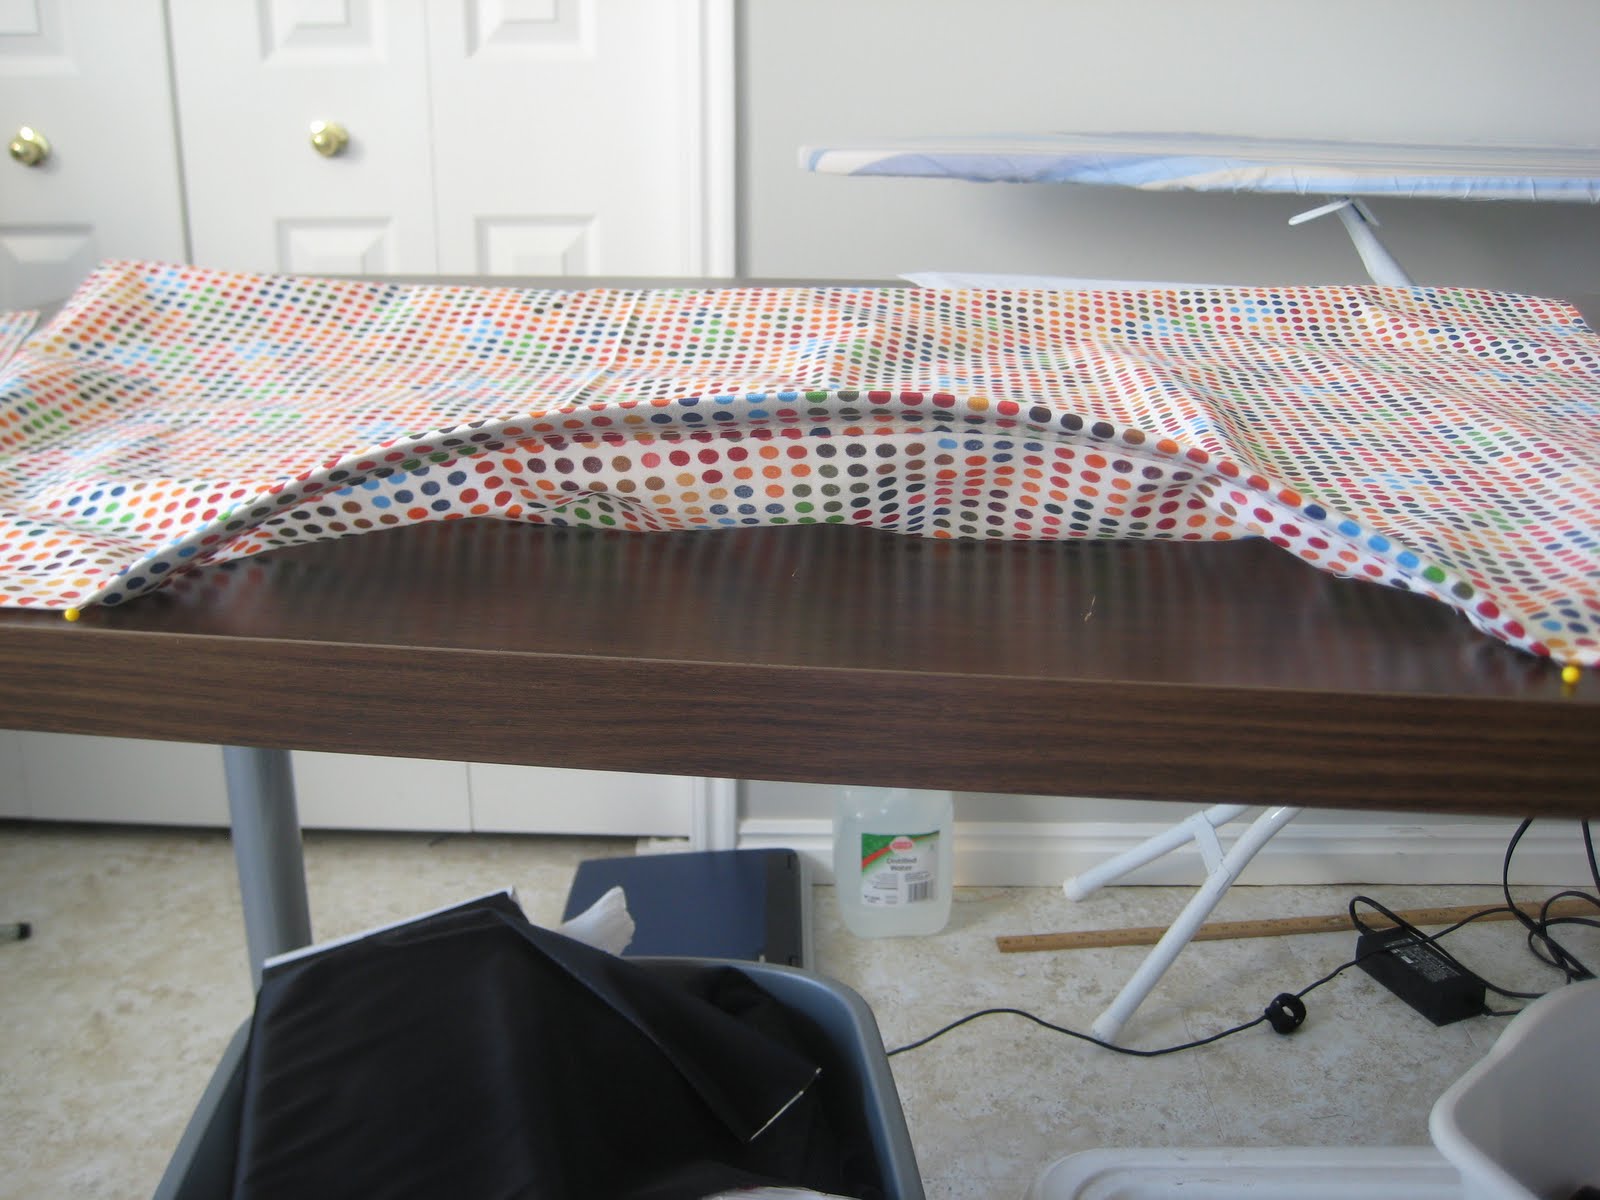
 Start by pressing a 1/4in. hem on the sides and bottom, then turn it again another 3/4in. and press. Sew the hem closed @ 1/2in. and press again.
Fold both the long and short strap in half with right sides together and sew 1/4in. seam. Turn inside out and press with the seam going down the back.
Long strap: fold one end inside itself 1/2in and press. Top stitch 1/4in. on all three sides and press.
Short strap: Put D rings half way down and fold in half. Top stitch 1/4in. on all three sides to secure rings.

Going back to your main piece, turn down 1/4in hem and then 1in. and press. Measure 8.5 in. from each side and pin. sew down hem just between pins. This is your casing for the boning. Slide boning in the casing. Next, pin the long strap on the right side and the short strap on the left as if you were wearing it. Pin them so the right sides are facing out and so they are as close to the boning as possible. Finish sewing rest of the casing closed.
 To finish, bring up both straps to the top, and secure either by just sewing the length of the straps, or top stitch across the entire top of the casing.
 Finally, press everything really well; every seam, ever wrinkle and use lots of steam.
Then comes the fun part, embellishing! Be creative with this part, you can make every one unique and fit different personalities. My favorite is to make these fabric flowers, or yo-yo's with fun buttons. To see how to make the fabric flowers follow the past post. I also used a thick thread on a large stitch to add a little interest.
 And there you have a fun, personal and unique nursing cover! These are a great shower gift if you already have one or don't necessarily need one. :)
 FINAL TIP: When you make anything, pressing is really important. If you press every step and do a finishing press, your project will stay nice longer and every seam, pleat, or dart will be permanent no matter how many times you wash it.
Happy Sewing!
 Next, pin the long strap on the right side and the short strap on the left as if you were wearing it. Pin them so the right sides are facing out and so they are as close to the boning as possible. Finish sewing rest of the casing closed.
 To finish, bring up both straps to the top, and secure either by just sewing the length of the straps, or top stitch across the entire top of the casing.
 Finally, press everything really well; every seam, ever wrinkle and use lots of steam.
Then comes the fun part, embellishing! Be creative with this part, you can make every one unique and fit different personalities. My favorite is to make these fabric flowers, or yo-yo's with fun buttons. To see how to make the fabric flowers follow the past post. I also used a thick thread on a large stitch to add a little interest.
 And there you have a fun, personal and unique nursing cover! These are a great shower gift if you already have one or don't necessarily need one. :)
 FINAL TIP: When you make anything, pressing is really important. If you press every step and do a finishing press, your project will stay nice longer and every seam, pleat, or dart will be permanent no matter how many times you wash it.
Happy Sewing!
February 15, 2011
Nursing covers
Being pregnant has shifted my project focus drastically. I also have about 6 friends & 3 family members who are or have been pregnant in the last year so I have been looking at new crafts and sewing projects, one of which is a nursing cover. I made this one for a friend and am planing on making a few more for other friends as well. I tend to make things up as I go so I have a hard time taking pictures of each step and recording my process. However, I have many more to make so now that I know what I'm doing I can more easily make a step by step tutorial for you in the near future.
It's really fun being able to make each one unique and special to fit everyone's style and personality, like this one with flowers and unique buttons. This particular design only takes one yard of fabric, one set of D rings, and 18 in. of boning. All this cost around $10 (depending on the price of your fabric) so it is much cheaper to make one than buying one from pretty much anywhere. You could also add ribbon or rickrack around the edges, use contrasting thread or even add pockets on the inside. There are so many possibilities!


February 10, 2011
Blog Signature
I just learned how to make a post signature! I followed the instructions from thecutestblogontheblock.com under secrets. I think its cute and it wasn't too hard! Yea for me!
Subscribe to:
Posts (Atom)

